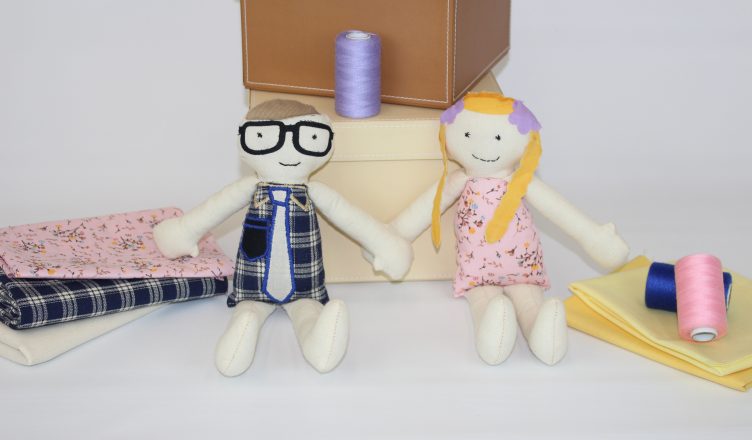
Make your daughter or granddaughter a gift they’ll never forget! Nothings more special than a gift made by the hands of someone you love! Download full pdf tutorial here for quick reference at home.
SUPPLIES: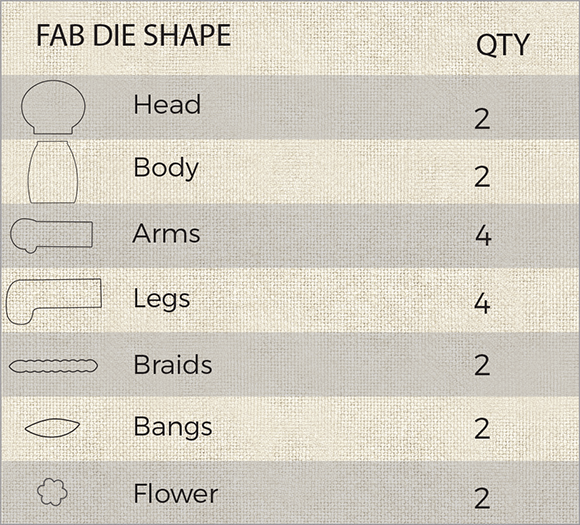
Die Cutting Machine
Fabric
A1080 Fab Dies Set
Iron
Fusible Web
Sewing Machine
Thread
Scissors
Pins
Needle (for hand sewing)
1. Select and cut your appliqué fabrics. Refer to the chart above for fabric and fusible web required for this project. Cut your fabric and fusible web to roughly the size of the die. Follow your machine instructions on die cutting or refer to our website for more information.
2. Sew the arms and legs. Gather your arm and leg layers and pair them with the faces together. Sew around the edges of all four with a ¼” seam allowance leaving the top straight edges open. Carefully cut small notches around the curves, making sure not to get to close to your stitch. This helps your arms and legs turn neatly. Turn them right side out and stuff each one with your poly-fil. Now take the legs and at that top straight edge and match the seams and pin closed. Sew along the edge. You will do the same thing for the arms, only do not match your seams, keep them on the edges of the arms.
3. Arrange and appliqué your details. Now we will add any details you desire on the body and add the bangs to the head. Layer your details on the front sides of your body and head pieces. With a layer of fusible web underneath, iron for 10 seconds on medium heat to adhere your pieces. Stitch around the edges of the pieces to secure them. Take two braid pieces and pair them up, face sides out, with a layer of fusible web in the middle. Iron to activate the web and repeat with the next braid. Now pin them to the head as desired. When pinning your braids in place have the front sides of the head and braid together. The bottom ends will be in towards the middle of the face and the ends of the tops of the braids will be pinned on the edge. To check your braids are in the right spot just fold over where it is pinned. With the braids tucked in towards the middle of the face place the remaining head layer face side down on top of the face. Pin in place and with a ¼” seam allowance sew around the head leaving the bottom straight edge open. Cut notches around the curve the same way as the arms. Turn your head right side out .
www.craftersedge.com
4. Sew the arms. Now you attach your arms to the head. With the face side of your head and the thumb of your arm both upright, match the edges lining up the seam of the neck to the middle or your arm. Pin them together and stitch in place. Do this with both arms.
Turn them right side out and stuff each one with your. Now take the legs and at that top straight edge and match the seams and pin closed. Sew along the edge. You will do the same thing for the arms, only do not match your seams, keep them on the edges of the arms.
5. Create the body. Take your two body pieces and with the faces together sew the right and left side with a ¼” seam allowance. With it still inside out, place the front side upright. Now take the head and slide it inside the body from the bottom with the front side upright as well. Line up the edge of the neck on the head with the on the body. The seams of the head and body should be matching. Pin in place and baste it together. Remove the pins and stitch all the way around the neck. It is a small opening so be patient, or hand sew if more comfortable.
6. Attach legs, stuff and finish. Turn your doll outside right and pin the legs to bottom front layer of the body. You want your edges to be matching and the feet to be facing and by the head of the doll. Sew the legs on the doll and flip them down. Stuff your doll to your liking and cleanly pin the bottom edge shut. To finish either run a straight stitch along the edge with your machine or use a ladder stitch with a hand needle.