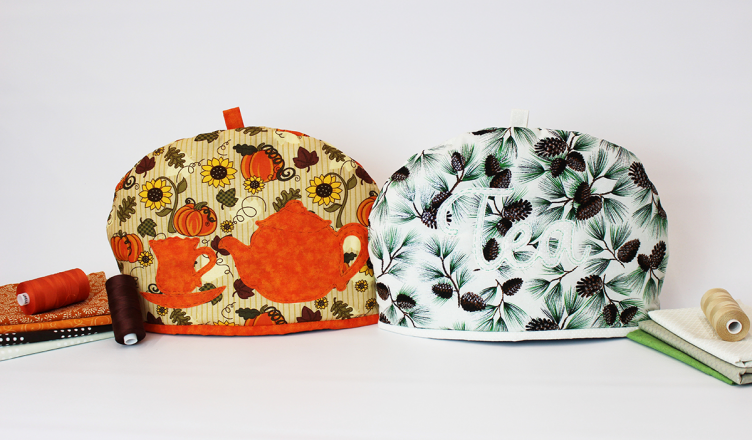
We are absolutely in love with this charming reversible tea cozy! Download the full PDF instructions for quick access at home.
Supplies:
»» Die Cutting Machine
»» W1130 and A1068 Fab Die Set
»» Sewing Machine
»» Thread To Match Or Coordinate With Your Selected Fabric
»» Freezer Paper 15” x 10”
»» Marking Pen
»» Cotton Fabric
»» Batting
»» Straight Pins
Instructions:
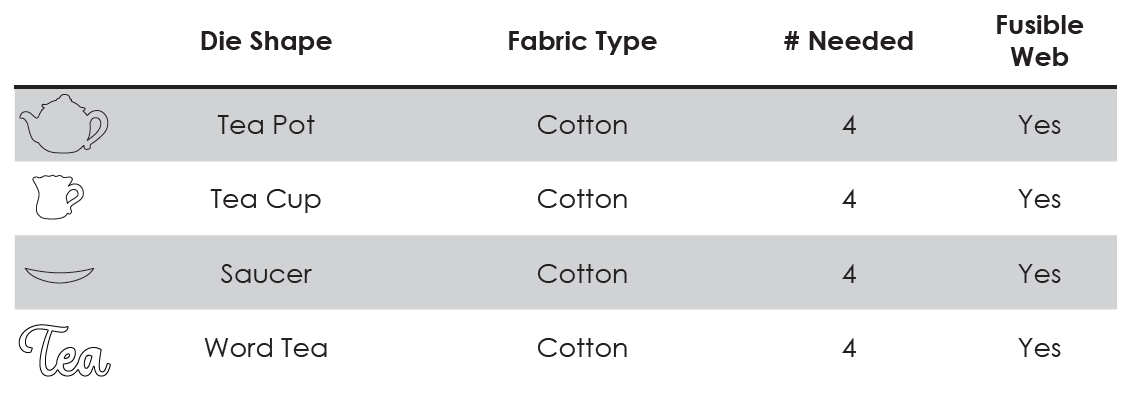
1. Select and cut your fabrics. Refer to the chart below for fabric and fusible web needs. To cut two of one shape, fold the fabric with the right sides together. Cut your fabric and fusible web to roughly the size of the die. Place the flat side of the die on the white base plate and your fabric/fusible web layers on top of the die. Put the metal plate on top of your fabric and sandwich it all together with the clear cutting plate. Adjust the roller width on your die cutting machine as needed and roll the plates through the machine twice (forward and back one time each).
2. Cut and prepare your pattern. Cut freezer paper 14” x 9” then fold vertically.
Note: Keep the 14” to the halfway point from the base to the top. You may fold your pattern in half horizontally to crease so you know where this point is. From the top center down to the base gradually create an arch. I created an arch by folding my pattern in half horizontally making sure the edges line up. Then using my scalloped ruler, I placed the ruler at the halfway point and adjusted to the top center and drew the line. Making sure the edges line up I cut one side and created a matching arch. Be sure to label your pattern for future projects.
3. Iron pattern. Iron the pattern shiny side down onto the fabric to adhere the pattern to the fabric for the body of the tea cozy.
Note: Do not attach this to the batting. Ask me how I know. Now you can lay the fabric on top of the batting and cut a total of four pieces (two fabrics inside, two fabrics outside and four battings – two for each side). Remember, this will be a reversible tea cozy. Since my fabric had glitter on it I ironed the pattern on the wrong side of the fabric… No worries because the print was non-directional. With this in mind, this would be a good time to stress keeping an eye on your directional prints, making sure tops are not turned upside down.
4. Arrange, layer and iron applique. Layer your applique with fusible web underneath and arrange onto the body of your tea cozy. Iron for ten seconds on medium heat to activate the fusible web. To secure your applique, use a small straight stitch.
5. Cut, sew and attach pull tabs. Cut two pull tabs (one for each side) 2 1/2” x 2 1/2”. I just cut this off the 2 1/2” width-of-fabric (WOF) cut that I got the 2 1/2” x 38” for the binding strip in step 6. Fold in half then fold each side to create a pull tab that will resemble a belt loop. Attach to body of tea cozy.
6. Sew front and back together. Now you can sew the front and back together catching the pull tab in the seam. Attach front to back using a 1/4” seam (This eliminates bulk).
7. Finish. Finish by placing wrong sides together and attach the binding (made from 2 1/2” x 38” strip) onto the base. Use the binding method of your choice. For this project I found the double fold binding worked very well attached by machine.
• Once sewn, gently pull each tab in opposite directions to lay flat. Smooth the arch and gently place one side inside the other smoothing the arch into place.
We would love to see your latest creations and hear any ideas you may have for our next projects. Share your tea cozy and ideas with us online!
Happy Quilting,
Connie L. Allison